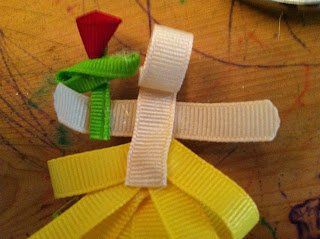
Belle is unique and fun with her red rose and curled ponytail.
Materials:
Hot glue
no-fray spray (or hair spray)
Start out with these lengths of ribbon:
Flesh colored: 2¼ ", 3"
Brown:3½ ", 3¼ ", a piece of ribbon that is 2½ " long when wrapped on a pencil (step 8)
Green: 2", 1"
Yellow: Five pieces of 5", two pieces of 2½ ", one 4"
Red: ½ "
Step 1: Roll flesh colored 3" piece of ribbon into a circle and glue. This will be your head.
Step 2: Take your five pieces of 5" yellow ribbon and glue two together at the ends in a v shape, like so.
3. Take another pice and glue over top, like so.
4. Take two more pieces and glue over top, like so.
5. Then take the piece on the bottom and fold it backwards so that the ends are touching. Glue in place.
6. Repeat for the rest of your yellow ribbons.
7. Here is what your finished skirt should look like.
8. Make the curl. Simply hot glue or tape one end of ribbon to a pencil or any other kind of long stick and wrap around then hot glue or tape other end to stick. Wrapped portion should be 2½ ", long. Then put it in the toaster oven for about 5 minutes on 200 degrees. When done, take out of toaster oven and unwrap. The ribbon should be sufficiently curly. PS you can do it in any oven, it doesn't have to be a toaster.
9. Take your two pieces of 2½ " yellow ribbon and fold in half and glue ends together. Then glue those two pieces to the top of your skirt, like so.
10. Glue the back of your body to the front of your skirt.
11. Take your 1" piece of green ribbon and fold in half lengthwise. Glue together.
12. Take your 2" piece of green ribbon and fold in half lengthwise and glue together.
13. Take your 2" piece of green ribbon and fold in a figure 8 with the ends meeting together in the middle. Glue ends together.
14. Glue your 1" piece of green ribbon to your green figure 8 piece 1/4" of the way down. This will be your rose's stem.
15. Take your ½ " piece of red ribbon and roll so that the back of one end is glued to the front of the other end, like so. Spray with no fray spray.
16. Turn around and upsidedown. Glue to green stem.
17. Take your 2¼ " piece of flesh colored ribbon and cut rounded ends. This will be your arms. Spray with no fray spray. Glue arms to back of body.
18. Glue stem to arm about halfway.
19. Fold hand over and glue in place.
20. Take your one 4" piece of yellow ribbon and cut ends in a fork shape. Spray with no fray spray.
21. Glue to middle of back just a hair above the arms, like so.
22. Fold over to front and criss cross over body. Glue in place.
23. Take your brown 3½ " piece of ribbon and glue ends together to make a circle.
24. Pinch 1/4" of the way to the left and glue together so you have a small loop and a large loop.
25. Take the large loop and fold over backwards to make a ball. Glue in place.
26. Glue to head like so, with larger ball toward the back and smaller ball toward the front.
27. Take your brown piece of 3¼ " ribbon and glue to middle of head.
28. Take ends and wrap around head. Glue ends to back of head.
29. Should look like this.
30. Take your curled brown ribbon and glue end to back of head.
31. Wrap brown curled ribbon around front and around arm. Glue in place. Done!
Share!


3 {comments}:
So cute thanks for all the tutorials.
I can't thank you enough for these tutorials! Just wanted to point out two errors- the step about curling the hair is left out, and the hair that wraps around the head is listed as the longer length instead of the 2" one.
Hi, I was amazed by your Disney hairbands!!! just wondering if you sell them.. I would love to buy them.. Please let me know! my email is jo.myweyoflife@gmail.com
Hope to hear from you soon.
Post a Comment